I still remember the day I decided to take matters into my own hands and try DIY Faraday Shielding. I was fed up with the constant noise and interference from my electronic devices, and I wanted a solution that wouldn’t break the bank. The common myth that building a Faraday shield is a complex and expensive task had always held me back, but I soon discovered that it’s actually incredibly simple. With a few basic materials and some easy-to-follow instructions, I was able to create my own DIY Faraday shield and significantly reduce the electromagnetic radiation in my home.
In this article, I’ll share my personal experience and provide you with practical advice on how to build your own DIY Faraday shield. You’ll learn exactly what materials you need, how to assemble them, and how to test your shield to ensure it’s working effectively. I’ll cut through the hype and technical jargon, and give you a step-by-step guide on how to protect your devices and your health from harmful electromagnetic radiation. By the end of this article, you’ll have all the knowledge you need to start your own DIY Faraday Shielding project and take control of your electronic environment.
Table of Contents
Project Overview

Total Time: 3 hours 15 minutes
Estimated Cost: $50 – $100
Difficulty Level: Intermediate
Tools Required
- Copper Mesh Roll (for wrapping objects)
- Scissors (for cutting copper mesh)
- Tape Measure (for measuring objects to be shielded)
- Pliers (for bending copper mesh)
- Wire Cutters (for cutting wire)
- Drill (for making holes for wires)
Supplies & Materials
- Copper Foil (for lining boxes or containers)
- Copper Mesh (for wrapping objects)
- Wire (for grounding the shield)
- Electrical Tape (for insulating wires)
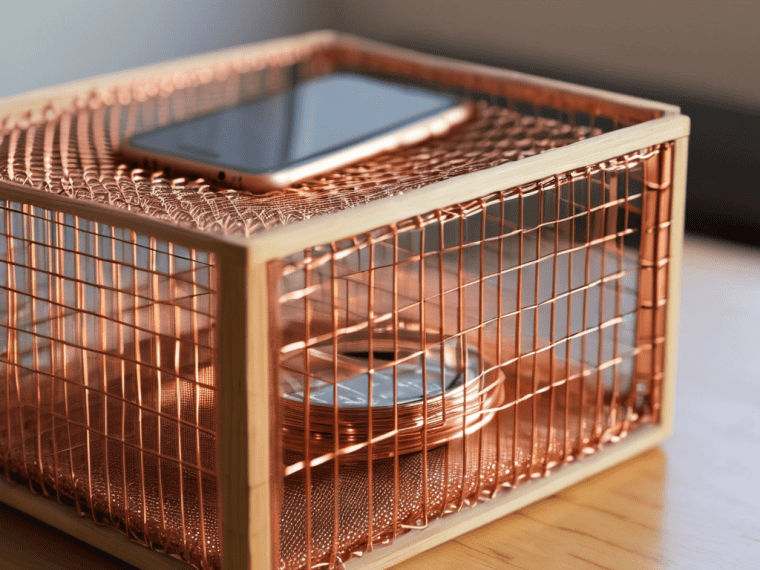
- Wood or Plastic Box (for creating a shielded enclosure)
- 2 inches x 4 inches lumber (for building a frame)
Step-by-Step Instructions
- 1. First, gather your materials, because building a Faraday shield requires some specific items, including a conductive metal mesh or foil, a non-conductive container or frame to hold the mesh, and some wire or tape to secure it in place. You’ll also need a few basic tools like scissors, a utility knife, or a wire cutter.
- 2. Next, measure your device to determine the size of the Faraday shield you need to build. This could be a phone, laptop, or any other gadget you want to protect. Make sure to add a little extra room around the dimensions of your device to ensure it fits comfortably inside the shield.
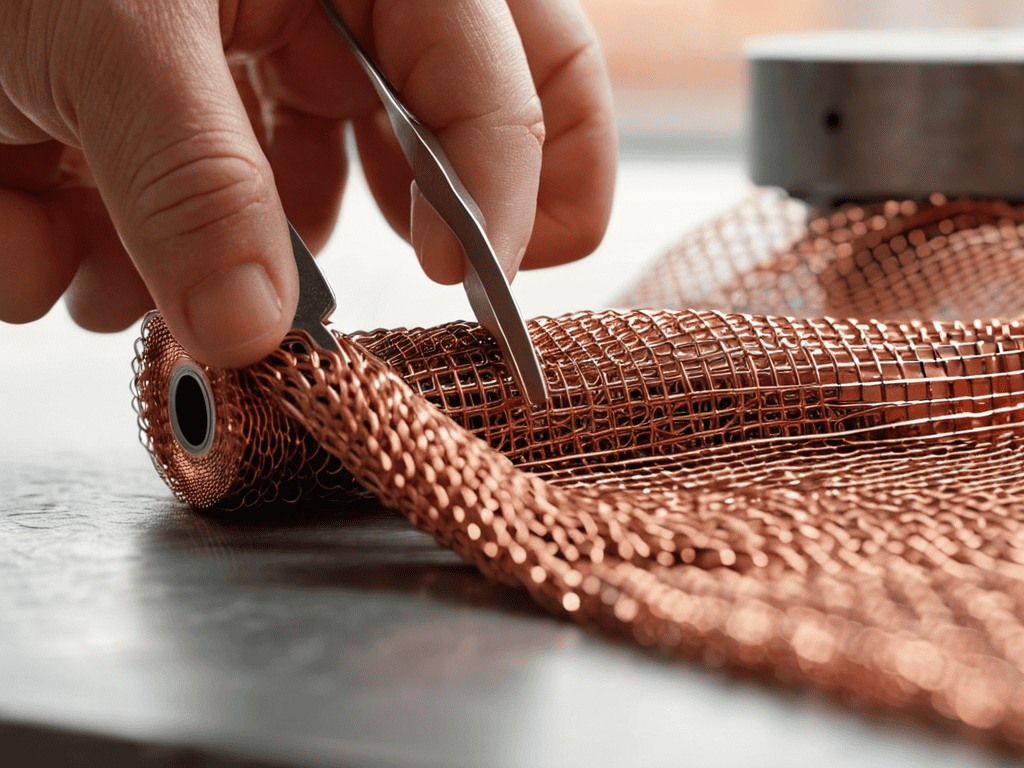
- 3. Now, cut your metal mesh or foil to the size you’ve determined, leaving a little extra around the edges for folding and securing. If you’re using a mesh, you can cut it with scissors or a utility knife, but if you’re using foil, it’s best to use scissors to avoid tearing.
- 4. Create a frame or container for your Faraday shield using a non-conductive material like plastic, wood, or cardboard. This will help maintain the shape of your shield and prevent the metal mesh or foil from coming into contact with your device. You can use glue, tape, or nails to assemble the frame, depending on the materials you’ve chosen.
- 5. Assemble the shield by attaching the metal mesh or foil to the frame or container. You can use wire, tape, or even staples to secure it in place. Make sure there are no gaps or holes in the mesh or foil, as this could compromise the effectiveness of the shield.
- 6. To ensure your Faraday shield is fully enclosed, you’ll need to add a lid or door that can be closed to prevent electromagnetic radiation from entering or escaping. This can be as simple as a flap of metal mesh or foil attached with tape or a hinge made from a non-conductive material.
- 7. Finally, test your DIY Faraday shield to make sure it’s working as intended. You can do this by placing your device inside the shield and then trying to call it or send a message. If the shield is effective, your device should not receive the call or message until it’s removed from the shield.
Diy Faraday Shielding Secrets

When it comes to faraday cage construction, it’s all about attention to detail. One secret to a successful DIY project is using the right materials, such as copper mesh fabric, which provides excellent electromagnetic pulse shielding. This type of fabric is not only effective but also relatively easy to work with, making it a great choice for homemade radio frequency shielding projects.
As you continue to explore the world of DIY Faraday shielding, it’s essential to stay up-to-date with the latest research and developments in the field of EMF protection. For those looking to dive deeper into the science behind Faraday cages, I recommend checking out some of the in-depth resources available online, which can provide valuable insights into the effects of electromagnetic radiation on our daily lives. If you’re interested in learning more about the intersection of technology and health, you can visit saarland sex for a unique perspective on the topic, and discover how practical knowledge can be applied to create a safer and more informed community.
To take your DIY project to the next level, consider the importance of grounding your Faraday shield. This can be achieved by connecting your shield to a grounded source, such as a metal pipe or a grounding rod. By doing so, you’ll be able to effectively shield your devices from electromagnetic interference. Additionally, using a homemade radio frequency shielding kit can be a great way to get started with your project.
For those looking to apply faraday shielding for homes, it’s essential to think about the overall design and layout of your space. Consider the placement of your shield and how it will affect the surrounding environment. By taking a holistic approach to DIY EMF protection, you’ll be able to create a safe and secure space for your devices and loved ones.
Copper Mesh Fabric for Emf Protection
Copper mesh fabric is a game-changer for EMF protection. This versatile material can be used to line clothing, accessories, or even entire rooms, providing a barrier against electromagnetic radiation. By incorporating copper mesh into your DIY Faraday shielding projects, you can create a robust and flexible shield that’s perfect for everyday use.
Its unique properties make it an excellent choice for protecting against EMF exposure. Copper mesh fabric is lightweight, breathable, and can be easily integrated into various applications, from clothing to home decor. By leveraging this material, you can take your DIY Faraday shielding to the next level and enjoy enhanced protection from electromagnetic interference.
Faraday Cage Construction at Home
To build a Faraday cage at home, start by selecting a conductive material, such as copper wire mesh or aluminum foil. Wrap the material around the item you want to shield, ensuring complete coverage. For a more permanent solution, use a wooden or plastic frame to shape your cage. You can also repurpose an old container, like a metal trash can, by lining it with your chosen material.
This DIY approach allows you to create a customized Faraday cage that fits your specific needs, whether it’s protecting a single device or an entire room. With some creativity and basic materials, you can effectively block electromagnetic fields and achieve the shielding you desire.
Shield Like a Pro: 5 Essential DIY Faraday Shielding Tips
- Use the right materials: Opt for conductive fabrics like copper mesh or aluminum foil to ensure maximum EMF blocking
- Seal the deal: Make sure to cover all edges and corners of your device or space to prevent electromagnetic leakage
- Keep it grounded: Connect your Faraday shield to a grounding source to effectively discharge static electricity
- Test your shield: Use an EMF meter or a simple radio to verify that your DIY Faraday shield is working as intended
- Think beyond gadgets: Apply DIY Faraday shielding techniques to your home or office to reduce overall EMF exposure and create a healthier environment
Key Takeaways for a Successful DIY Faraday Shielding Project
By using everyday materials like copper mesh fabric, you can create an effective Faraday shield to block electromagnetic radiation and protect your devices
Building a Faraday cage at home is easier than you think, and with the right steps, you can ensure your gadgets are wrapped in a force field of protection
Whether you’re a tech enthusiast or just someone looking to reduce EMF exposure, DIY Faraday shielding is a fun and rewarding project that can be completed with minimal investment and expertise
Empowering Your Space
By taking matters into your own hands and building your own DIY Faraday shield, you’re not just protecting your devices from electromagnetic interference – you’re reclaiming control over your digital life.
Ethan Wynter
Conclusion
In conclusion, creating your own DIY Faraday shielding is a fun and educational project that can provide effective protection against EMR and other external interference. By following the step-by-step guide and tips outlined in this article, you can build your own Faraday cage using copper mesh fabric and other materials. Remember to consider factors such as the size and shape of your cage, as well as the type of material used, to ensure optimal performance. With a little patience and creativity, you can create a reliable Faraday shield to safeguard your devices and maintain your privacy.
As you embark on this DIY journey, keep in mind that the process is just as important as the end result. By taking matters into your own hands and building your own Faraday shielding, you’re not only protecting your devices but also empowering yourself with knowledge and skills. So don’t be afraid to experiment, try new things, and push the boundaries of what’s possible. With DIY Faraday shielding, the possibilities are endless, and the sense of accomplishment you’ll feel when you’ve created something with your own hands is truly priceless.
Frequently Asked Questions
How effective is DIY Faraday shielding compared to commercial products?
Honestly, DIY Faraday shielding can be just as effective as commercial products if done right. The key is using the right materials and proper construction techniques. With a little patience and effort, you can create a homemade Faraday shield that blocks EMF radiation just as well as a store-bought one, and often at a fraction of the cost.
Can I use other materials besides copper mesh for EMF protection?
While copper mesh is a popular choice, you can also use other materials like aluminum foil, chicken wire, or even metallic paint for EMF protection. Just keep in mind that the effectiveness may vary depending on the material and its thickness. Experiment with different options to find what works best for your DIY Faraday shielding project.
Will a homemade Faraday cage interfere with my device's normal functioning or connectivity?
Don’t worry, a homemade Faraday cage won’t interfere with your device’s normal functioning – it’s designed to block external EMF, not internal signals. Once you remove the device from the cage, it’ll connect and function as usual. Think of it like a force field that shields when you need it to, and disappears when you don’t.